
It’s been two years since we first decided to start using banker’s boxes for storage at OMG. The idea has worked out great, and that original storage shelf is still going strong and sees constant use, but we filled it almost immediately. We had originally planned on making several of those shelving units, but they’re pretty tedious to assemble and we don’t have a ton of wall space.
Coincidentally, we’ve been talking for ages about making some updates to the six modular benches in our main shop area. They were put together 7 or 8 years ago, and some are starting to show their age. We’ve also changed our ideas about space utilization, and have been interested in moving to a smaller number of larger benches – we rarely have six different big projects going at once, but we often have projects overflow onto a second bench.
Learning from our past experiences, both the earlier workbenches and the banker’s box shelving, we set out to design benches that anyone could build, using simple tools, in a single afternoon. We decided to spend a little extra money on nicer materials than the particle board and construction lumber used in the earlier benches, but always keeping in mind that these are workbenches. We drill into them (often on purpose), cut into them (usually on accident), spill chemicals on them, grind dirt into them, hammer on them, and occasionally set fire to them. So fine furniture, they ain’t. And, of course, we wanted to fit as many banker’s boxes as possible under the work surface.
Enter the B³. It’s alliterative, and it’s also roughly the third generation of workbench for OMG.

Each bench offers over 18 square feet of work surface, up from about 8 square feet on each of our old benches, and holds 20 cardboard banker’s boxes. And all four edges include a 2-inch overhang to allow projects to be clamped to the surface easily. Finally, if the top surface is installed using screws, it’s easily replaceable when we inevitably drill, burn, smash, gouge, or blast too large a hole in it. And if the top is glued, it’s easy enough to resurface it with a fresh layer when those same things happen. After all, it’s a workbench.
The bulk of the bench is made from two sheets of ¾” ACX or BCX plywood, which is usually pretty nice to work with. The top is ¾” MDF because it tends to be flatter and smoother than comparably-priced plywood, although you could substitute MDO or finish-grade plywood if you wanted. The edge overhangs are doubled up to make them sturdier. And the whole thing is finished off with a face frame made from select pine boards, to tidy up the appearance and stiffen the front edge of the shelves. The shelves should be good for about 200 pounds each.
To build these benches, all you really need is a hammer, tape measure, circular saw, router with a ¾” straight bit, and a straight edge. A table saw will make some of the cuts easier, and an 18-gauge brad nailer or 15-gauge finish nailer will speed up assembly.
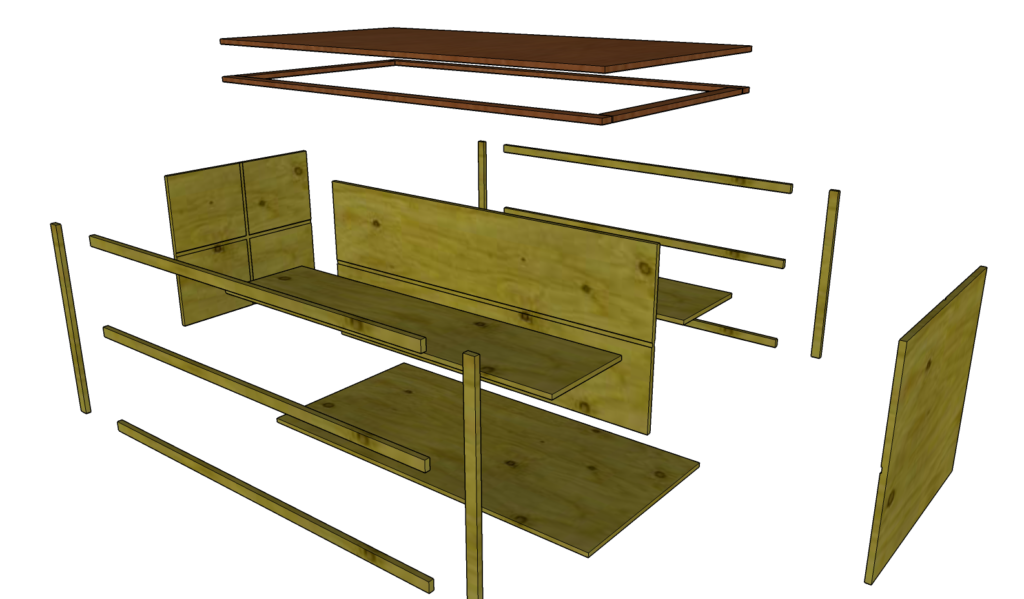
- Using the dimensioned drawings below and your circular saw or table saw, cut all plywood parts to size.
- Use a table saw dado stack or a straight edge and ¾” router to cut ⅛” deep dadoes on the end panels and center divider as shown. This is slightly oversized for ¾” nominal plywood, but it’s only going to create one minor hiccup in the assembly.
- Attach the end panels and the center divider to the base piece, paying close attention to the orientation of the dadoes – they sit ¾” closer to the bottom than they do to the top so the openings wind up equal once the height of the shelf is included. All three uprights sit on top of the base and can be secured using glue and pocket screws or brad nails. Here’s the one hiccup – the center divider needs to be very well centered for the shelves to fit right, but it’s being aligned by an oversized dado. Try to center it within the dado by eye before driving nails.
- Glue the shelves in the remaining dadoes. You should probably use clamps or some (pre-drilled) screws to pull them fully in position, to ensure the glue has a good hold. There’s only ⅛” of material holding those shelves up, so a small gap can be a big problem later on.
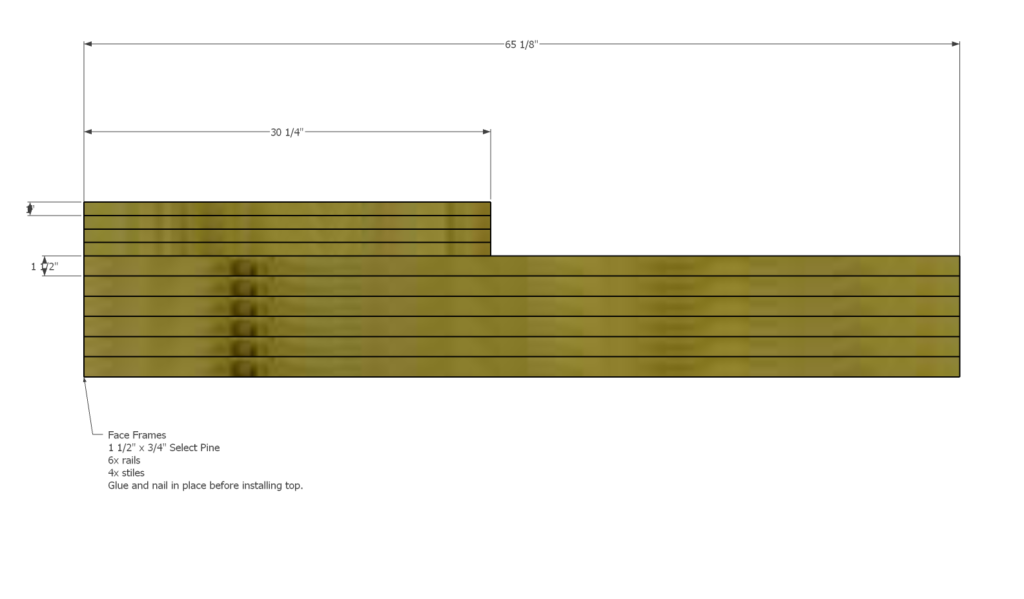
- On to the select pine face frames. Cut the four stiles (verticals) first, and glue and nail them flush with the outer edge of the side panel. If you aren’t using a table saw, and couldn’t find material 1 inch wide, you can use wider material (up to 1½ inches) by securing it flush with the inside edge of the side panel instead.
- Then, measure and cut the rails (horizontals) to fit between the stiles you just installed, and glue and nail them in place. The top rail might need some creative clamping for now, as it’s only supported by the stiles.
- Cut the MDF top to size. For the stiffest bench, you may wish to apply glue to the top edges of everything – the three uprights and the two top rails. If you think you might need to replace the top in the future, you can instead secure the top to the shelving unit with pre-drilled screws. If you’re taking this approach, you may still want to glue the upper pine rail in place for the stiffness it provides to the top, but you could leave that piece unattached to the rest of the face frame. It’ll just come off (and be replaced) with the top later on.
- Cut MDF strips 2 inches wide to double the edges of the top. Attach with clamps and glue – try not to put a bunch of metal in here since we tend to cut/drill into it.
- Install casters. Make sure they’re inset far enough to spin freely and not catch the face frame.
- Once glue is dry, use your router to flush trim and round the edges of the top.
- Finish the bench off by filling any screw holes with wood putty, and coating everything with a durable paint or varnish. We’ve had good results in the past with 1-part “epoxy” garage floor paint, which is widely available in such versatile colors as Gray, Silver Gray, Slate Gray, and the enticingly-named Battleship Gray. If you favor bold colors, look for traffic striping paint or oil-based enamels. If you favor uncolored wood products, an oil-based indoor polyurethane would give good protection. This time through, we went with Rustoleum Industrial Oil-Based Enamel, which Menard’s can actually tint about two dozen different colors. It’s probably best to avoid water-based latex paints, despite the alluring color options, as even the exterior-grade stuff just isn’t meant for the kind of heavy use a work surface gets.


Shopping List:
- Two sheets of ¾” nominal ACX or BCX plywood. Choose the flattest sheets you can find.
- One sheet of ¾” MDF, or use MDO or finish plywood like Baltic Birch for a stiffer or more attractive surface.
- Six “select pine” boards 8′ long and 1½” x ¾” (probably 1″x2″ nominal), or a smaller number of wider boards if you’re comfortable using a table saw to make thinner strips.
- 4-inch locking casters.
- Wood glue, wood putty (to fill holes), and your choice of durable paint or varnish.
- Brads, finish nails, or pocket screws.