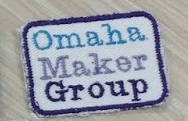
Our embroidery machine can embroider text and borders very easily thanks to our wonderful donor.
If you are unclear at any step, please consult the babylock manual for the machine. It’s in the drawer labelled “Embroidery Machine Manual”.
You will need at least the medium hoop for our standard patch.
Cut a piece of fabric about 3/4″ larger than the hoop. Cut a piece of embroidery stabilizer that same size. Place the stabilizer over the inner portion of the hoop. Place the fabric over both of these. Then place the outer portion of the hoop over all of that, ensuring the post holes are opening towards the floor and the right-side of your fabric is on top. Flip this over and gently tug the fabric and stabilizer taut. Cinch down the hoop and tug fabric and stabilizer even more taut.
On the machine, ensure the embroidery foot, embroidery needle and embroidery arm are attached. Turn on the machine (do not attach the hoop to the machine yet). When prompted, click/press the “Check” button. The machine will do a calibration.
Hit the white “Embroidery” menu button on the screen.
Click on the on-screen button with a bunch of shapes. This will allow you to create the border. Select the rectangular option and then the solid bold line. On the next screen click the “layout” button. On the layout screen, click the size button, and resize the rectangle to 4.5 cm x 6.3 cm. When you’re finished, click the “End Size Changr” button. Then orient it however you’d please. You’ll need to match this orientation for your words.
If you have not done so, thread the machine with a bobbin matching your fabric (or your top thread) and the top thread in the color of your preference. OMG’s official patch has a dark purple border with a white fabric background.
Now, attach the hoop to the machine.
Lower the presser foot and click the green back-lit “Start/Stop” button. If this is not green, stop, something’s wrong. Consult the manual or Sarah if she’s available.
In about 3 minutes, you’ll have a border.
Clean up the extra few stitches the machine puts in the middle with a seam ripper.
Click the white “Embroidery” button on the screen. Click the letters with the serifs. Assuming your border is the OMG dark purple, click on the “L M S” button until “S” is highlights, and then type in “Group” (lower-case letters are in the visual tab below the upper-case letters). Now click “Layout”. Orient the words with your border. Next, position the needle near the bottom middle of the interior of the border. If you’re doing math, it’s 0.2 cm from the bottom.
Again, lower the presser foot (if needed) and click the green back-lit “Start/Stop” button. If this is not green, stop, something’s wrong. Consult the manual or Sarah if she’s available.
In about 3 minutes, you’ll have the word “Group”.
Switch the top thread out to light purple. Click the white “Embroidery” button on the screen. Click the letters with the serifs. Click on the “L M S” button until “S” is highlights, and then type in “Maker” (lower-case letters are in the visual tab below the upper-case letters). Now click “Layout”. Orient the words with your border. Next, position the needle near the bottom middle of the interior of the border. If you’re doing math, it’s 1.5 cm from the bottom.
Again, lower the presser foot (if needed) and click the green back-lit “Start/Stop” button. If this is not green, stop, something’s wrong. Consult the manual or Sarah if she’s available.
In about 3 minutes, you’ll have the word “Maker”.
Switch the top thread out to bright blue. Click the white “Embroidery” button on the screen. Click the letters with the serifs. Click on the “L M S” button until “S” is highlights, and then type in “Omaha” (lower-case letters are in the visual tab below the upper-case letters). Now click “Layout”. Orient the words with your border. Next, position the needle near the bottom middle of the interior of the border. If you’re doing math, it’s 2.25 cm from the bottom.
Again, lower the presser foot (if needed) and click the green back-lit “Start/Stop” button. If this is not green, stop, something’s wrong. Consult the manual or Sarah if she’s available.
In about 3 minutes, you’ll have the word “Omaha”.
Lift the presser foot and pull up the hoop. You now have a completed embroidered pattern! Remove the fabric from the hoop. Removing as much of the backing as you can. Cut a piece of iron-on adhesive to fit the size of your patch. Attach this with an iron per the adhesive’s instructions. Peel off the paper backing from the adhesive. Carefully cut out your patch!
Now, clean up the extra stitches the machine added between each letter and you’re done! Iron-on that patch wherever you please!

